
A beginner’s guide to making effects with node-based shaders in Shader Forge for Unity
Shader Forge is a node-based interface that enables game developers to create shaders for Unity applications.
Shaders are a useful thing for every 3d designer to know. Not only do artists need to know how to use them to make a game look pretty, but programmers can also use well optimized shaders to make a game run more efficiently. Shaders can also work with scripts to create some cool gameplay dependent effects.
The concepts covered in this guide are not only Unity/Shader Forge specific, they apply to shaders in any 3d package. Shader Forge is very similar to UDK’s node-based material editor. The nodes in Shader Forge are also directly related to the code that is used to write shaders. Learning how to use a node based visual programming tool like Shader Forge is a good start on the path to learning the logic behind programming shaders overall.
Learning the tools and logic used when writing a shader will help both artists and programmers understand how shaders work in any 3d package and any tool. It will also help them to understand the limitations and possibilities of the effects that can be used when adding visual ‘juice’ to a game.
Procedurally Generated Content, and a Non-Destructive Workflow
Using shaders appropriately can contribute tremendously to a time efficient and easily iterated workflow. Shaders can be set up very easily to create procedurally generated content, providing a near limitless amount of variability with relatively little resources and effort.
This can be achieved by setting up appropriate user-accessible variables called propertied. Nodes that are ‘properties’ in Shader Forge are green. Properties can vary from material to material, so that several materials based off of the same shader can look and behave very differently.
This allows you to procedurally generate variations on the same material without having to create new content. This also allows you to quickly iterate on a material, making tweaks and adjustments by simply adjusting a few variables. Setting up appropriate properties is also important working with other people. It allows other people who do not necessarily understand shaders to iterate on the materials in meaningful ways.
Masks/Maps
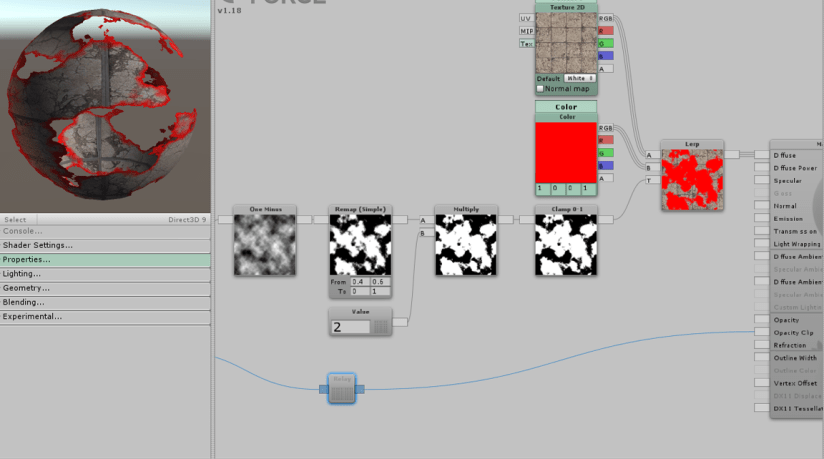
The concept of a mask or map is invaluable when working with shaders. The most common mask is a transparency mask, with white areas being opaque, black areas being transparent, and values in between being slightly transparent. However masks can be used for all sorts of things other than transparency to great effect. A mask can be used in any situation where you want something to happen in one part of your shader or material, but not another.
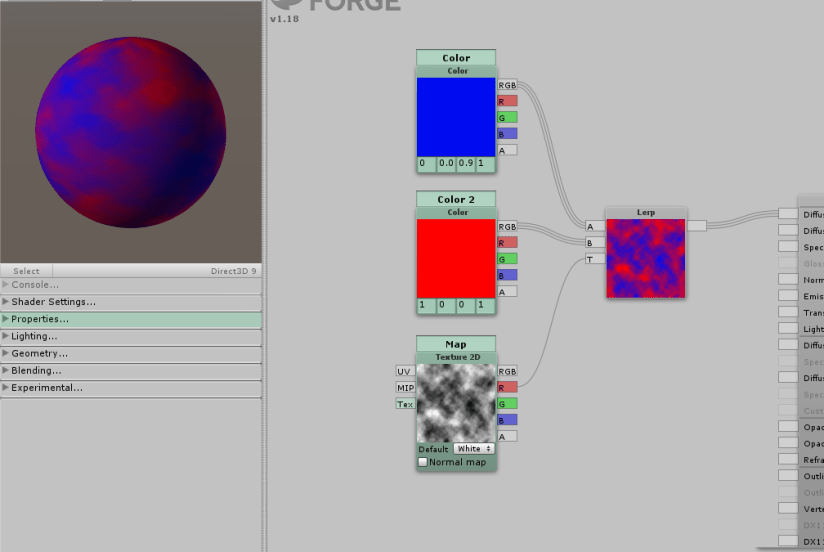
A simple mask used to create a cloudy blue and red surface.
Why not bother with masks in a shader and not just make the image in photoshop? Because of these phrases: Non-Destructive Workflow, and Procedurally Generated Content. If you use an image, any time you want to change the colors or the transition between the colors, you will have to go back and generate a new image. If you want to have more than one material with the same type of mask but different colors, you will have to create several different images. This is not resource efficient.
Using a cloud mask allows you to change the colors you are using in editor. It also allows you to modify the mask procedurally. This means not only can you make changes easily, thus speeding up your workflow, but you can also create several variations of this same material without increasing the number of necessary images, creating near infinite variability with relatively little effort and file size.

By using a mask instead of a simple colored texture, one is able to change the colors used, and the behavior of the mask with very little effort.
Channel Masks
For a mask to work, all you need is a single value from 0 to 1 for each pixel on the mask. An image has the potential to have 4 channels, Red, Green, Blue, and Alpha, each capable of containing a different value from 0 to 1. Thus, you can save space and time by creating a single image that holds 4 different masks.
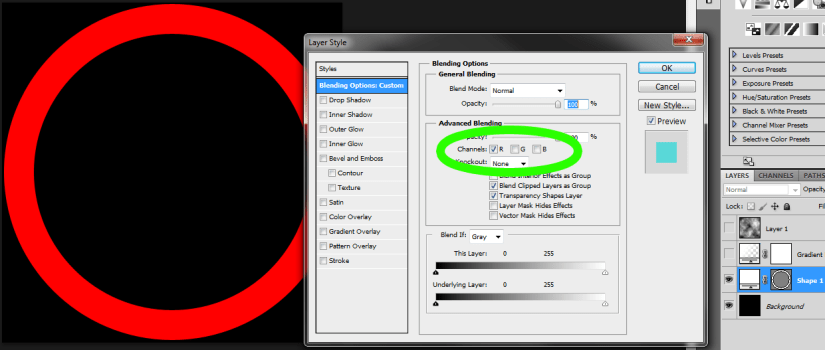
Double click a layer in photoshop that you want to use as a mask and turn off all but one of the channel boxes.

If you also have an alpha channel, make sure to save your image as in a format that supports 4 channels, and that you choose 32 bit rather than 24 bit when saving it out.
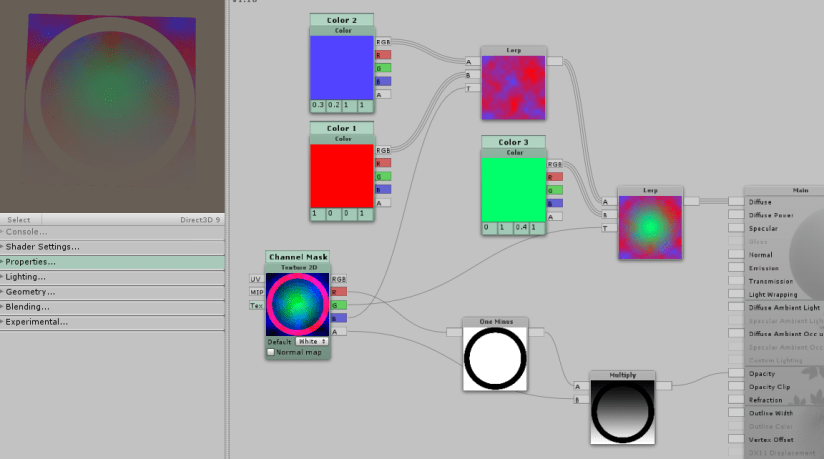
In Shader Forge, you have the individual color channels from a texture node to use as masks. The node called ‘Channel Mask’ has its 4 channels each being used in a different way within the shader itself.
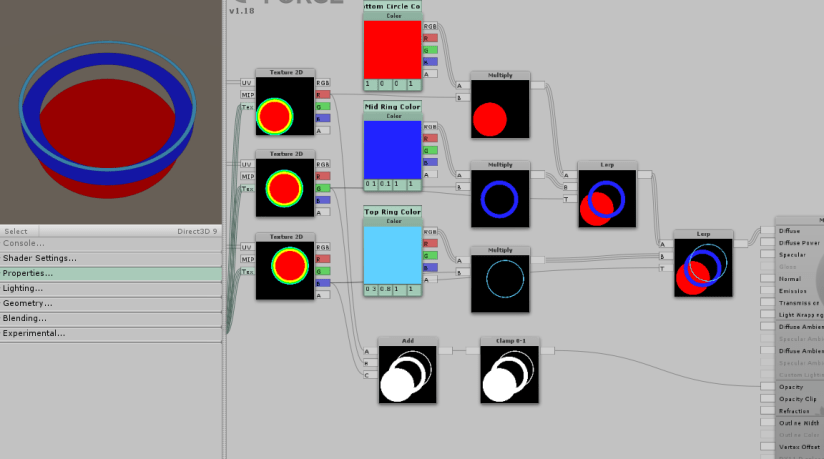
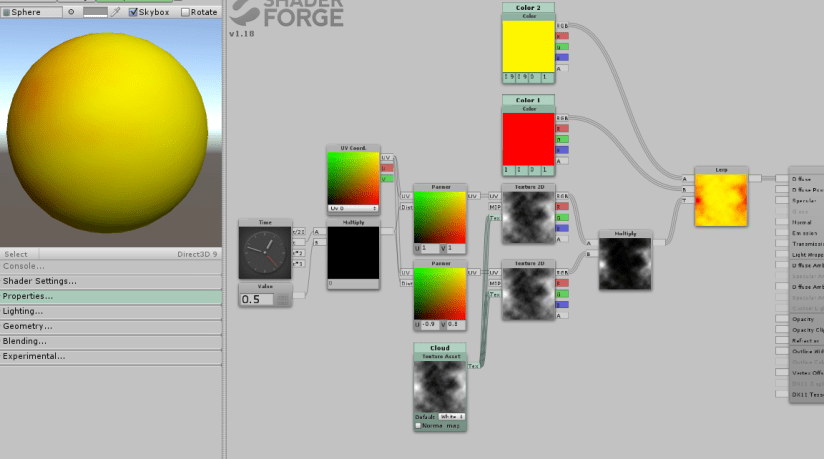
Lerp Node
The Lerp, or Linear Interpolate node (which can be seen in the example above) is one of the most useful nodes. It is most commonly used with masks but also any combination of nodes that generates values from 0 to 1. Places on a surface where the value corresponds to 1 will take input information from whatever nodes are plugged into A, and places corresponding to 0 will take information from B. The T input is how the node determines what places to use B input and what places to use B input.
In the above example, blue and red colors are plugged into A and B of a Lerp node. A cloud mask is plugged into T. Places where the cloud mask is black, or has values of 0, are Blue. Places where the cloud mask is white, or has values of 1, are Red. The same thing happens with the next Lerp node. The mask plugged into T is a radial mask, with white values in the center and black values at the edges. Near the edges, where the values are 0, it takes color information from what is plugged into A, which is the cloudy combination of blue and red. Where the values are 1, it takes the color information from what is plugged into B, which is a flat green color.
Fresnel Node
The Fresnel is one of my favorite nodes. A Fresnel is basically a dot product between the surface normal and the viewing angle. In layman’s terms, a Fresnel outputs 1 for pixels where the surface is facing you, 0 for pixels that are facing perpendicular to you, and -1 for pixels facing away from you. This node can be used to create a variety of really nifty effects.

By using a Fresnel as the T input for a Lerp node, I can blend two colors together on a surface based on whether or not the surface is facing me. This means, that on a curved surface, the edges of the surface will always be a treated differently no matter how you turn the object. In this case, the edges will always be blue.
The EXP input changes the exponent of the output, so the higher the EXP value, the thinner the Fresnel.

Learning to use the other math nodes to modify a mask like a Fresnel can help a lot in expanding the usability of these nodes.
In the example above, I have used a remap node to modify the Fresnel. Now instead of having pure blue only at values of 0, I have pure blue all the way up until values of 0.2. And instead of pure yellow only at a value of 1, I have pure yellow from values of 0.7 to values of 1.

You can also use an ‘if’ node to get a sharp edge, creating a toon-like outline.
Notice in the example above that I have used a green node for the B input value of the ‘If’ node, making it a ‘property’. This means it is now accessible in the inspector for the material. I have named this property “Outline Cutoff” because modifying this value will change the thickness of the outline. You will also notice the two color properties in the inspector as well.

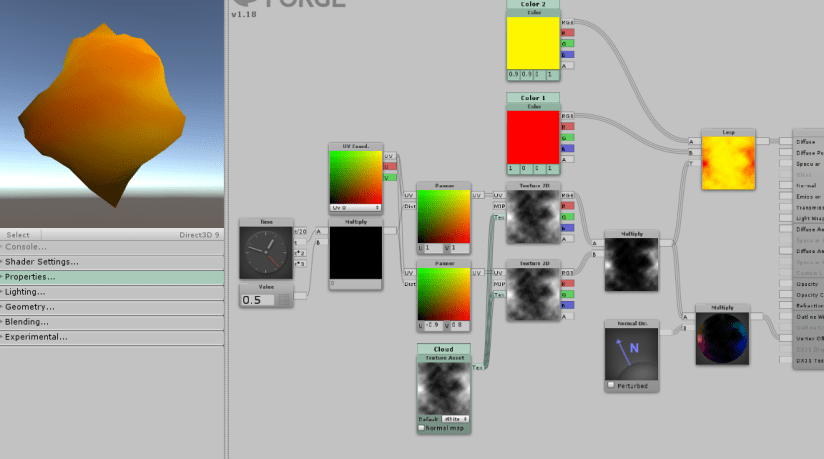
The same shader applied to some more complex geometry shows how even a simple shader can already add a lot of visual interest to a surface.

This technique can be used to create cool rim-lighting or glowing effects. It can also, as demonstrated, be used to create stylized toon outlines.

You can use a Fresnel to make an effect like that on the masks in Skyrim to give them that ethereal otherworldly glow.
Depth Blend
The Depth Blend node will determine how close the rendered pixel is to the background geometry and output 1 to 0 based on the input distance. Basically, this node can be used to change a surface based on how close it is to any other surface. This is most commonly used to make particles fade as they intersect the ground, but it can also be used to make other really cool effects.
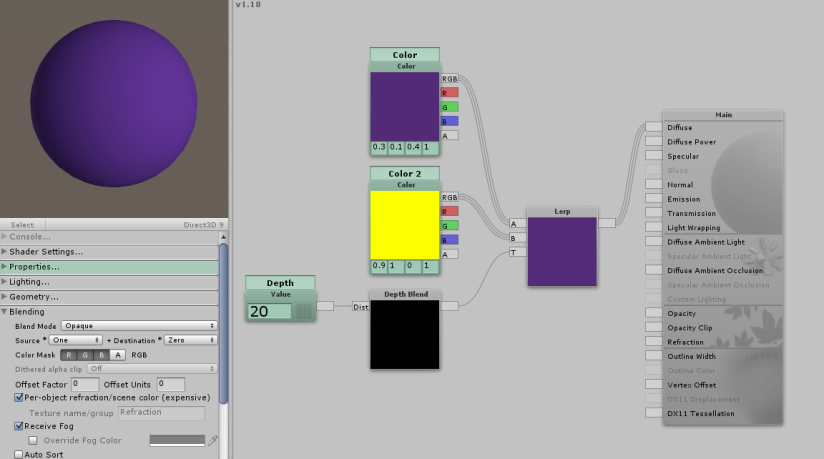
The depth blend node can be used as a mask for a lerp. The DIST input on the depth node is the distance of the fade.

This shader changes from purple to yellow near areas where it intersects with the bottom ground geometry. This effect dynamically updates as the objects move.
The depth blend node is very picky about the settings it needs in order to work. Thus far I have determined that the ‘Auto Sort’ and ‘Write to Depth Buffer’ check boxes need to be off. The ‘Order’ also needs to be set to ‘Transparent’. The ‘Render Type’ can be anything as far as I am aware. You will also need a light in your scene that affects the objects with the shader in order for the effect to work.

Depth blend is how you would make a ‘laser scan’ effect and also how you would simulate the foam on a sea’s shore as it intersects with land geometry.

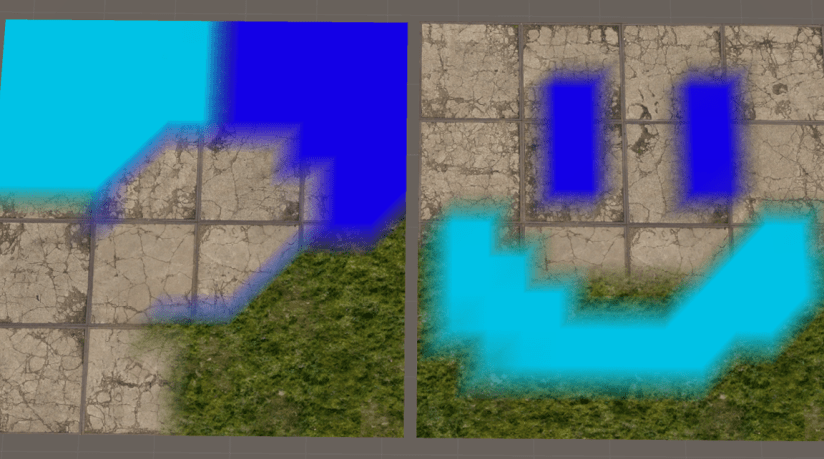
Depth
Depth is cool for a very similar reason that the distance node is cool. Depth will output the distance between the camera (or View Position) and the surface (or World Position). This can be used to make changes to a shader based on how far away a surface is to the camera.

I have created a ‘Distance Mult’ property to modify the output of the depth node so that I can easily change the distance at which the effect starts to take place. Because depth will output values higher than 1, I have also used a ‘Clamp 0-1’ node.
Below is the result of the above shader. All three objects have the same material applied to them. Due to the depth node in the shader, objects further away from the camera are red, and objects closer are teal. If I were to move around the scene and get closer to and further away from the objects, their color would change in real time.

Below is a more complex shader using the same principles.

This shader uses textures and a mask with the depth node. This shader will use lerps and depth to show a green leafy texture over the object when it is far away, and have the green leafy texture disappear when the objects gets closer.
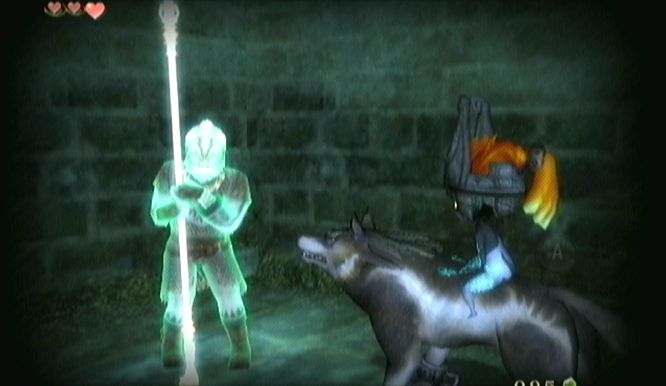
The Depth node can be used for all sorts of cool effects. For example, you could use this node to create the effect of the ghost soldiers in Twilight Princess appearing when you get close to them. You could also use this technique for clouds, to make them fade as the camera passes through them.
Distance
Distance is very similar in its uses to Depth, but much more versatile. Distance can be used just to find the difference between any two vectors. It is most commonly used (and most easily explained) in combination with position nodes like View Position, Object Position, World Position, and Light Position. Like with the Depth node, you can use combinations of these nodes to get some pretty cool effects based on where objects are in relation to each other.

This is a shader that will lerp between two colors based on how close part of the surface is to a specific location. I find the distance between the World Position, (or the world position of a specific part of the surface) and an input vector, or property, that I have called ‘Object Location’.
If the input vector “Object Location” is programmed to update to a specific object’s position, for example this sphere below, the shader could procedurally and dynamically change to follow that object and react to its proximity as it moves around in game.
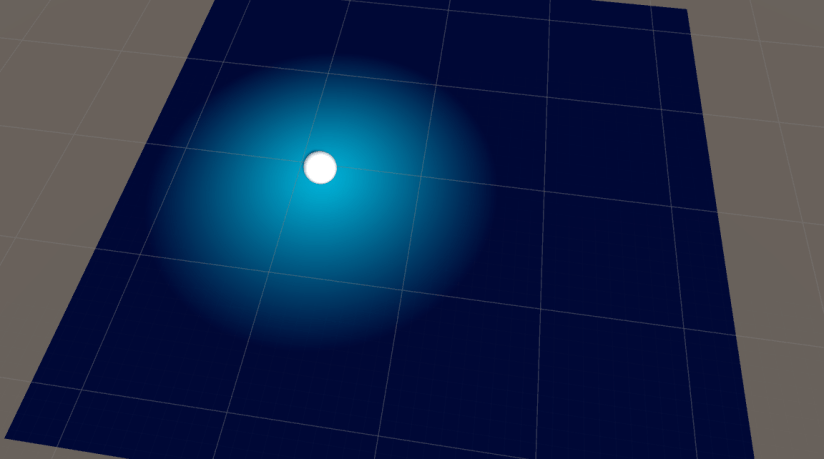
The input vector “Object Location” has been set to the same value as the position of the sphere.
This can be used to create effects like auras, or ripples in water. This principle is the root of shaders that can track the player’s movement. For example, footprints and dynamic sand and snow shaders, as exemplified in Journey.

The distance node can also be used to determine the distance between two different objects in the scene to affect a shader. This could be useful for specific types of puzzles. Bring two objects in the scene next to each other, like two totems, and a rune on the wall could appear.
Vertex Color
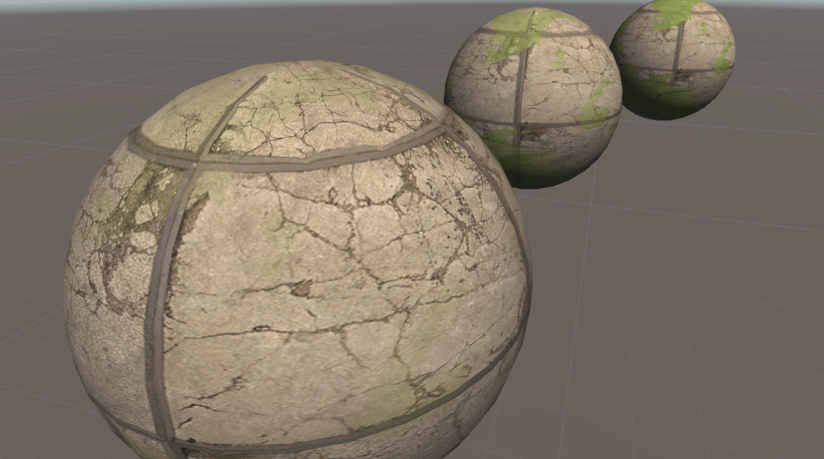
This node is useful for making fine detail variation between the materials of multiple meshes without having to make several textures, or even several materials. For vertex color to work, you first have to apply vertex color data to the vertices of a mesh. Vertex color will then apply textures to those vertices based on the color data that they have.
The caveat with this node is that you need a tool that has the capability of writing vertex colors to a mesh. Maya has the Paint Vertex Color Tool, and UDK has a built in tool which allows you to paint vertex color. Unfortunately Unity does not have a built in tool. However there are several relatively cheap tools in the Unity store that can provide this feature. Another caveat with this tool is that since the data is stored per vertex, its level of detail and control is based on the amount of geometry that a mesh has. This can have very limited usefulness for extremely low-poly meshes.
Vertex color is most useful for things like terrain, things that have a high poly count and for which making a dedicated texture is difficult and not time efficient. However, as stated before it can also be used to add fine levels of detail to meshes by layering ‘grunge’ textures.
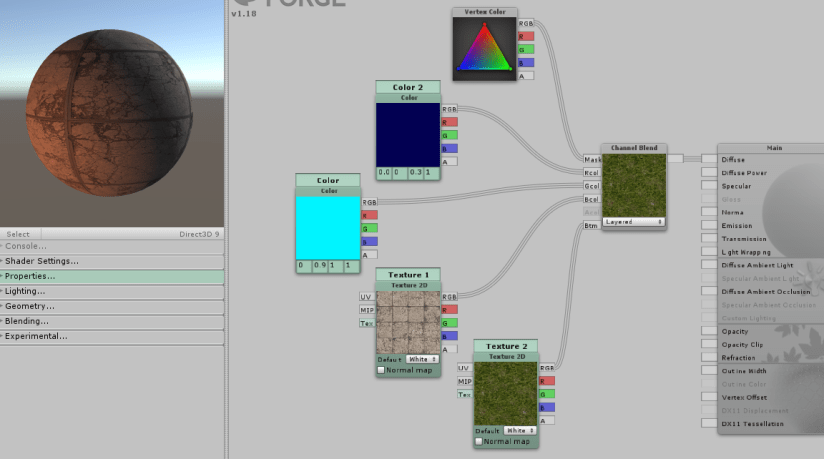
A channel blend node is useful in conjunction with a vertex color node. This same result can also be achieved using a string of lerp nodes, and/or blend nodes.
These two planes have the same material applied to them, but they appear different because their vertex colors are different. There is an infinite amount of variation that can be created with this one material and a mesh that has vertex colors applied.
Parallax
This node is very useful for creating perspective effects. Essentially, it will visually move parts of your texture relative to other parts so that it looks like those parts are at different depths in the scene, even when they are on a flat surface.

This material is on a single flat plane, you can see how the material changes to simulate depth based on your perspective.
The parallax node accomplishes this effect by warping the UV coordinates of a texture. To get separate depths as in this example, you need to use different parallax nodes for different planes.
The first part of this shader modifies the UV coordinates of the texture using 3 parallax nodes with different depth property inputs. A clamp is used to prevent the texture from repeating.

The second part of this shader colors the rings using channel masks and places them over each other. It also applies the opacity using the same masks.
This technique can be used for things like cool 3d sci-fi holographic screens. Or even for windows, to make it appear as though there is a world beyond a window, when in reality it is a flat plane.

Sliders and Transitional Shaders
Sliders are basically values that you can easily slide from one value to another. These are usually used in conjunction with programming to create smooth transitions in shaders. They can be used for anything, but one of the most common uses for a slider is the ‘dissolve’ effect. This uses a mask to transition from one state to another.

This shader makes the orb look like it is dissolving away, and uses a red glow around the edges to highlight the dissolve.
The first part of this shader uses a slider to add a value to a cloud mask. This mask is used directly for the transparency.

The second part of this shader modifies the mask so that it can be used in a lerp for the diffuse to create the red glow around the edges of the dissolve.
Transitional shaders can be used for dissolving away a character, or for burning a book. I have even used them to transform a shiny new treasure chest into an old dilapidated treasure chest. This technique can be used with a very clever mask to create the dissolving ribbon-y effect used in Breath of the Wild when Link warps.

Screen Position
This node has less usefulness than others, but it can still be used to do some fun stuff stylistically. All it does is outputs the pixel’s position on the screen. When plugged into a UV slot of a texture, you can use this node to create objects with patterns on them that do not move with the scene.

Below are a couple examples of the type of art style that could be achieved in 3d using this 2d screen position pattern technique.

This node can also be used to change aspects of a shader based on where the object is on the screen. This shader below will make objects on the left side of the screen yellow, and objects on the right side of the screen red.

All these objects use the same shader. They will also change color as their position changes relative to the screen.

Time and Animated Shaders
The time node allows you to easily change anything about a shader over time. There are infinite uses for this node and it can be used to animate anything dynamically.
This shader uses two layered cloud maps that are panning at different rates and in different directions in order to create an interesting swirling cloud effect.
Vertex Offset
This has always been one of my favorite tricks when it comes to shaders. You can move the vertices of a mesh right in the shader, allowing you to do some cool animated effects without the need of animating a mesh by hand or dealing with rigs and anim-trees. Vertex offset can also be used in conjunction with normal maps or height maps to emphasize lighting.
Taking the shader created for the ‘animated shaders’ section, I have simply multiplied the cloud mask by the surface normal to create a wibbly wobbly animated sphere.
Conclusion
There are obviously dozens more nodes, and endless combinations that you can use to create amazing shaders. You can even change how light works in your shader. :O
The best way to learn I have found is to look at the things other people have done, and dissect their methods. There are limitless things you can do with shaders, and if you can learn to use them effectively, they will add a level of juice to your game or application that can take it to the next level of awesomeness.
There are tons of other resources online, for Shader Forge, check them out and get inspired!
Shader Forge in the Asset Store – If you are wondering where to get Shader Forge, look no further!
Shader Forge Tutorials – The Shader Forge website itself has a lot of helpful and inspiring information about their tool.

